Tuesday 20 December 2016

Main Task: Music Magazine Double Page Spread

This is how I designed my Double Page Spread, I used Photoshop and Indesign to create this document.


 This first image is of me, we took this picture in town. Firstly I removed my spots, blackheads and any other marks with the 'Spot Healing' tool. Then I made the image monochrome by selecting 'Image' then the 'Black/White' option.


 This next image is of David, we took this picture in the green screen room, First I made the image into a Threshold; I did this by selecting 'Image' 'Adjustments' then 'Threshold'. After that I removed any of the shaded parts of the green screen by selecting them with the 'Magic Wand' tool then colouring the selected parts in white with a brush tool.

Here I added my Background to my Double page spread, I chose this image because the Threshold is similar to my front covers image. I also started to add my basic text (meaning where I roughly plan to put my text)
I began to add my actual text as well as boxes that would be placed behind the text, making it stand out. I put the boxes behind the text by making sure the text is at the front, I did this by right clicking on the text box then selecting 'Arrange' then 'Send to front' I also added a couple of my images but removed one of them since I wanted to place it on my contents page instead


 Here I moved the text in order to fit in with the page, I also made the text wrap around the two images in the page. I began to create my headline, in every music related double page spread I studied the headline was a quote or statement by the artists featured in the magazine, so I created two different copies Title and made one of them white, I then placed the white text in front of the black to add a 3d effect, this is similar to the masthead on my front cover. I then made the rest of the text 2d and changed the colour to red to add contrast between the text in the title.


Here I added the same pattern of my contents page onto my double page spread, I used this behind my text instead of a blank box to make the page more eye catching as well as keep a constant theme going throughout my three pages; Thresholds, Black and White or Red
 
 Here I began to make my final image for my double page spread, I chose a drum set because I had to put more music related images in my magazine. I started to remove the text with the 'Spot Healing' tool, then, to keep with the theme, I made the image monochrome.


This is the final product of my Double Page Spread, I decided to make the central image the main focus of the page with the text being based around the "Artist" featured in the image, this is similar to other double page spreads I studied, I made sure my typography and imagery suited the theme I went for in the rest of my magazine. 


Thursday 8 December 2016

Main Task: Music Magazine Contents Page


 This is how I designed my Contents Page, for this project I used Photoshop and In-Design to make my images and the the Contents Page.


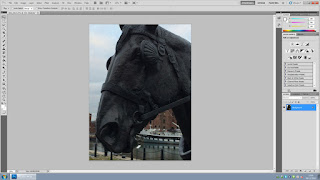
 This first image I wanted to turn into Monochrome, I did this by selecting 'Image' then selecting the 'Black and White' option.


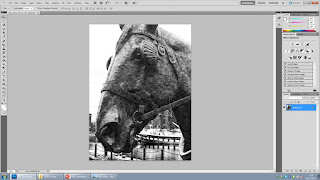
This image I also wanted to turn into Monochrome, again  I did this by selecting 'Image' then selecting the 'Black and White' option, after doing so I noticed the scratches and marks on the horse statue stood out more while in black and white, so I adjusted the 'brightness and contrast' to firstly hide the marks, this made the image too dark, then I decided to use this to make the marks stand out more, I did this because the scratches and marks made the statue look older which suits the dull theme I wanted for my Magazine. 


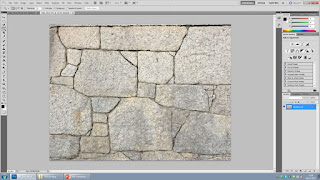
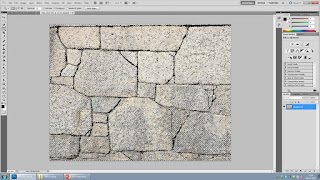
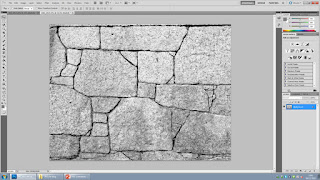
This next image I wanted as a background Image, the cracked stones adds to the dull and 'edgy' theme that I wanted for my magazine, I started by making the cracks and marks in the wall darker and stand out more from the rest of the wall, I did this by selecting one of the larger parts of one of the cracks with the 'Magic Wand' tool, Then I selected all of the other cracks by going into 'Select' then 'Similar' this highlighted all of the cracks, then with the Paint Brush and the desired shade of black I coloured in the rest of the cracks


Here I started to make my contents page, I estimated that I would need Four Columns. I began by placing a title spelling 'Contents' and I used a font similar to the fonts featured on my Front Cover, I began planning ahead placing a background to the text of my contents page, so I only placed a 'Rectangle Frame' tool behind the text, I did that by right clicking on the box, selecting 'Arrange' then 'Sent to Back'. I also added my first image to my contents page, I did this by placing a 'Rectangle Frame' then selecting 'File' then 'Place' then selected the desired image.


 I then began to add colour to my boxes, I did this by selecting the box then changing the colour from the toolbar. I began to add the names of the "Bands and Artists" featured in my magazine.

I added a Backdrop to my Contents Page, I did this by making a 'Rectangle Frame' then going into 'File' then 'Place' then selecting the image I wanted with the box already selected. I also added another Image and I added another Background for the text on the lower part of the page as well as wrote down my contents.


Here I began to create a Background with a colour scheme that is similar to my Front cover; to get the right shade of red I placed a screenshot of my front cover into Photoshop, then when I selected my brush colour, I clicked on the red in the cover to get the same colour.


Then, using the 'Paint Bucket' tool I covered the entire page in the same shade of red that is in my front cover. then using a brush pre-set, I covered the image in black spots which is a pattern I intend to use behind my text in my other pages as well, to keep with a consistent pattern and colour scheme


When I put the pattern behind my image and text I added a red box to go in front of the pattern but behind the text, this is so the text can be read clearly.
Here I copied a new version of my title and made it white, this was so I could create a 3d effect that I have used for my masthead in my front cover, only this time the colours are reversed, this is to make the title of this page different from the masthead if only slightly.
I also did the 3d effect to the 'Features' and added a black box behind the 'Artist Featured' to make the text easier to read in front of the stone background.

 Here I began to create my final image for my contents page, which would replace the image of the horse since it has nothing to do with music, with this image I wanted the background to be in black and white but the guitar to be in colour.
I did this by cropping out the guitar with the 'Lasso' tool, ten one the image was fully cropped I copied and pasted it into a new layer. Then I made the background black and white on its separate layer.


After placing the image into the page I was nearly finished with my contents page, until I realised that the contents themselves were barely visible and  were missing the page numbers, I added them in in big bold writing and the same font as my front covers Masthead.


This is the final product of my Contents page, in the end I am happy with how this turned out, I made it similar to the rest of my magazine with the colour scheme and typography as well as the images used (the use of monochrome)


Main Task: Music Magazine Front Cover

This is how I designed my front cover; for this project I used Photoshop to design my Images and In-design to design my Front cover.


This is my original image which I edited to be my central image for my Front Cover.

 First I made the image Monochrome, I did this by going into 'Image' then selecting the 'Black and White' option.


Then I wanted to make the image look
something like a stencil, I did this by selecting
 'Threshold' in the 'Image' tab.
This is the Final Product of my 'Central Image'. I made the image Red and Black by firstly selecting a section of white with the 'Magic Wand' tool, then going into 'Select' then clicking 'Similar' this highlighted everything that was white. Then I used a brush toll with the desired shade of red and coloured in the image. Since the white parts of the image was highlighted with the magic wand the parts in black wouldn't  be affected by the brush.

Firstly I placed my image into the Background by making a box with the 'Rectangle Frame' tool then selecting 'File' then 'Place' and finally picking the desired image.


Here i decided on the name of my magazine as well as the Headline and the name of one of the "Bands" that will be featured in my magazine. I picked "The Abyss" as my Masthead because it suits the dull and 'edgy' theme I wanted.


Here I added and image of Davids face
in order to fill up some of the empty
space, eventually i decided to remove it
since it seems out of place and it adds
nothing to the cover worth adding.
Here I added a Graphic Feature stating that there is exclusive content in the magazine, this would attract people who wanted to find out news that other magazines don't cover. I also added my cover lines to the front cover with stories about the "Bands".

Here I decided to make the Masthead bigger, this is because every Front Cover we have been studying has featured a large, bold and visually appealing Masthead. I had an idea to copy and paste a white version of the Masthead then place one over the other to add a 3D affect.


Firstly I started with black over white, then I did white over black. Then I looked at the two together and decided to go with White over Black since the black Masthead adds a shadow affect to the image and, in my opinion, looks more visually appealing

This is the Final Product of my Front Cover; I did the same with the Headline as I did with the Masthead, copying and placing a black copy of the Headline and placing it behind the first to add a shadow affect, Then I made my cover lines fit onto the stairs in the background.